Relay — a simple dashboard
Set up your Relay dashboard
Choose your entities, copy the settings into Home Assistant, reload RESTful commands and save one automation. Then check your first update. No router changes needed.
Relay works with the Home Assistant you already run at home, including behind CGNAT. It gives you a separate dashboard, rather than the full Home Assistant interface. Compare Relay and Proxy.
Open my setupBefore you start
- Use Home Assistant 2024.10 or later and keep a local way to reach it.
- Confirm it can connect to the internet over HTTPS.
- Back up its configuration and have a file editor ready.
- Start with one or two entities that already work in Home Assistant, such as a light and a temperature sensor.
Home Assistant starts a secure HTTPS connection to our service. It sends the updates you choose and collects requests from your Relay dashboard. You don’t need to open an incoming port. Our service receives your selected data; keep your account password and connection token private.
Free Relay includes up to 5 entities, with updates and action checks every 60 seconds. Standard supports 100 entities with 15-second checks; Large supports 200 with 10-second checks. Relay does not include your full Home Assistant interface, cameras or Home Assistant’s full history.
With the latest automation, paid Relay also sends a fresh update after carrying out a request. Changes to selected controls can send an earlier update too. The dashboard shows the state reported by Home Assistant; a slow device or connection may need another scheduled check. Already using Relay? Copy the current automation from Relay settings and replace your existing one. Keep your configuration as it is.
1. Choose your entities
An entity is one control, reading or action in Home Assistant, such as a light, temperature sensor or script. A smart plug’s switch and power reading are two entities and each counts toward your limit.
- In Home Assistant, open Developer Tools → States and copy the exact entity IDs.
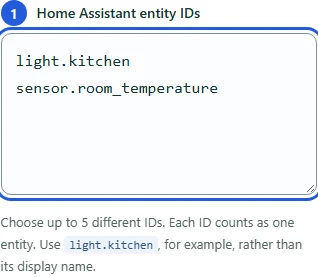
- Open your Relay’s setup from Connections and paste one ID per line.
- Select Save selection and continue. Your setup creates the configuration and automation for that selection.
- Lamp control
light.living_room_lamp
Reported state and an on/off switch.- Temperature reading
sensor.living_room_temperature
Latest reading and unit.- Power reading
sensor.desk_plug_power
Latest power use.- Existing script
script.test_lamp
A Run button.
These IDs are fictional examples. Replace them with IDs from your installation. Home Assistant explains entities and domains.
2. Add the configuration
- Select Copy configuration in your Relay setup.
- Open Home Assistant’s
configuration.yamlin your file editor and add the copied block. - Save the file. In Developer Tools → YAML, select Check configuration, fix any errors, then reload RESTful commands.
If you already have rest_command:, merge the two command entries into that section. Keep your existing entries. Do not add a second rest_command: key. If that section uses !include, add the entries to its included file instead.
Can’t find RESTful commands?
In Developer Tools → Actions, run rest_command.reload. If that action is also unavailable, check the configuration and restart Home Assistant once to load REST commands for the first time.
Add this configuration once, even if you have more than one Relay plan. It contains no personal token or entity IDs and uses Home Assistant’s built-in RESTful Command integration.
Where do I edit and check configuration?
The file location and editor depend on your Home Assistant installation method. Follow its configuration-file guide. Make a backup, correct any reported errors, then reload RESTful commands after the check passes.
3. Add your automation
- Select Copy automation in Relay setup.
- In Home Assistant, open Settings → Automations & scenes and create or edit the automation.
- Open the three-dot menu and choose Edit in YAML. Replace the automation’s contents with the copied code.
- Select Save and keep the automation enabled.
The code already includes your selected entities, update schedule and private connection token. Paste it as provided. Keep the code, automation traces and backups private because they can contain that token.
Saving this automation needs no Home Assistant restart. The official editor guide explains the menu and save controls.
4. Check the first update
Return to Relay setup and select Check for update. Free Relay checks every 60 seconds; network delays can take longer. Once all selected entities have sent an update, you can open the dashboard.
If only some entities have reported, select View available readings to see them. If there are no values yet, follow the checks below. Always check the last-update time.
Try a harmless action, such as switching a lamp you can see. Watch for the reported state to match your request. Then turn off home Wi-Fi on your phone and try the dashboard over mobile data.
For everyday use, bookmark your dashboard or My home. Sign in with your account on this site, not your Home Assistant login.
Use your dashboard
Readings show the last value received. Lights, switches, fans and on/off helpers have an on/off switch when their readings are current. Older readings use separate On and Off buttons so they do not look live. Scripts have a Run button. Locks and covers are view-only until you enable their controls in setup. Sensors and numbers are always view-only.
- Waiting to send
- Your request is waiting for Home Assistant to collect it. You can cancel it while it waits. If it is not collected within five minutes, it expires.
- Sent; waiting for a reported result
- Home Assistant has collected the request, so it can no longer be cancelled. The card updates when Home Assistant reports the new state. Check the device itself when you need to be certain.
- Readings may be out of date
- No recent update has arrived. You can still request a change, but Home Assistant must collect it within five minutes. Check the home connection if requests keep waiting.
A request expires if Home Assistant does not collect it within five minutes. After collection, an unconfirmed request clears after another five minutes. Neither means the device changed. For scripts, check Home Assistant to see whether they finished. Update intervals are a schedule; connection problems can delay both updates and actions.
Search by name, room or entity ID. Open Filters to narrow the list or switch to a compact view. Use the arrow on a tile to see its details. Open Settings for room editing, connection status and help with controls.
Organize entities into rooms
Choose Organize rooms under Quick actions, or open Settings → Organize rooms. Areas from Home Assistant appear as rooms. Assign a room to any entity without an area, then use Move up and Move down to arrange the rooms. These changes only affect Relay and need no automation update. If you later assign an area in Home Assistant, that area takes priority.
Use a paid personal address
Standard and Large include a personal subdomain, such as your-home.myhomeassistant.top, subject to availability. Choose it from Connections. It opens the same private Relay dashboard, so you don’t need to change your automation. Free Relay uses a private dashboard link without a personal subdomain.
Change your entities later
- Edit the IDs in Relay setup and save the selection.
- Copy the updated automation.
- Open your existing Relay automation in Home Assistant, replace its contents in Edit in YAML and save.
Follow the same steps after upgrading your plan or changing lock and cover permissions. Your token stays the same. You don’t need to edit configuration.yaml or restart Home Assistant. Keep one enabled automation for this Relay plan.
Replace or disable the connection token
Replace connection token stops the old token immediately and clears waiting actions. Your saved readings stay visible. Updates can resume after you save the new automation with the replacement token. Copy the new automation into your existing Home Assistant automation and save it to reconnect.
Disable connection token stops the token and clears readings and waiting actions. An action Home Assistant already collected may still run. Create a new token and save the new automation when reconnecting. These actions do not change a separate Proxy connection.
Optional alternative: use the Home Assistant connector
The optional connector lets you choose entities inside Home Assistant. It handles the updates itself, so you use it instead of the configuration and automation above. If switching to the connector, turn off the existing Relay automation for this plan.
- Download the connector and copy
custom_components/myhomeassistant_relayinto your Home Assistant configuration folder. - Restart, then select Settings → Devices & services → Add integration → My Home Assistant Relay.
- Choose entities in the integration and enter the token from your private Relay setup.
Use its options to change the selection. This alternative requires Home Assistant 2026.9 or later and must be installed manually. It is not currently available through HACS.
Sensor history and device controls
Open View history on a sensor card to see temperature, humidity, power or other numeric readings. Free Relay keeps 24 hours; Standard and Large keep 7 days. We save one reading every five minutes, starting with updates received from now on. Older Home Assistant readings are not imported. Missing or unavailable readings leave gaps in the chart. Removing a sensor also removes its history.
Add your vacuum’s entity ID, such as vacuum.downstairs, then save the updated automation in Home Assistant. The dashboard shows Start cleaning, Pause and Return to dock when your vacuum supports them. If you use the optional connector instead, install the latest download (0.3.2 or later) and restart Home Assistant.
For locks and covers, add the entity ID to both your selection and Locks and covers that may be controlled. Save the generated automation to enable Lock/Unlock or Open/Close. Relay does not send PIN codes or support controls that require one. Shared users can use the same enabled actions.
A request waits for Home Assistant’s next check. The dashboard shows the new state only when Home Assistant reports it. Returning to the dock can take longer than starting or pausing. A cleared or expired request is not proof that the device finished; check its reported state.
Not seeing an update?
Check these in order:
- Confirm Home Assistant is running and can reach the internet.
- Make sure you reloaded RESTful commands after adding the configuration.
- Open the Relay automation and check that it is enabled.
- Check that every selected entity ID exists in Developer Tools → States.
- Open the automation’s trace to see which step failed.
Use the message below to find the next step.
Connection messages and unusual setups
- Unknown action: check that
rest_command.mha_relay_pushandrest_command.mha_relay_fetchwere added under one configuration section. Check the YAML and reload RESTful commands. - Unauthorized: the token may have changed or the plan may no longer be active. Copy and save the current generated automation.
- Rate limited: keep only one automation or connector enabled for this plan, using its generated schedule. Repeated manual runs also count toward the limit.
- Too many entities: reduce the selection to your allowance. Rejected updates leave the last valid readings in place.
- Payload rejected: states must fit 128 characters and the full update must fit 64 KiB.
- Legacy templates: this automation expects modern templates. If
homeassistant.legacy_templates: truewas explicitly enabled, use the default modern behavior, check configuration and restart. - No controls: check the entity type, update freshness and any lock/cover permissions. An unknown state can mean an incorrect ID.
Relay setup shows which entities have reported and how much of your plan’s limit you’re using. Remove tokens from screenshots and automation traces before sharing them. Open a support ticket.